Step 1 – Create a Spring Boot application and add dependencies
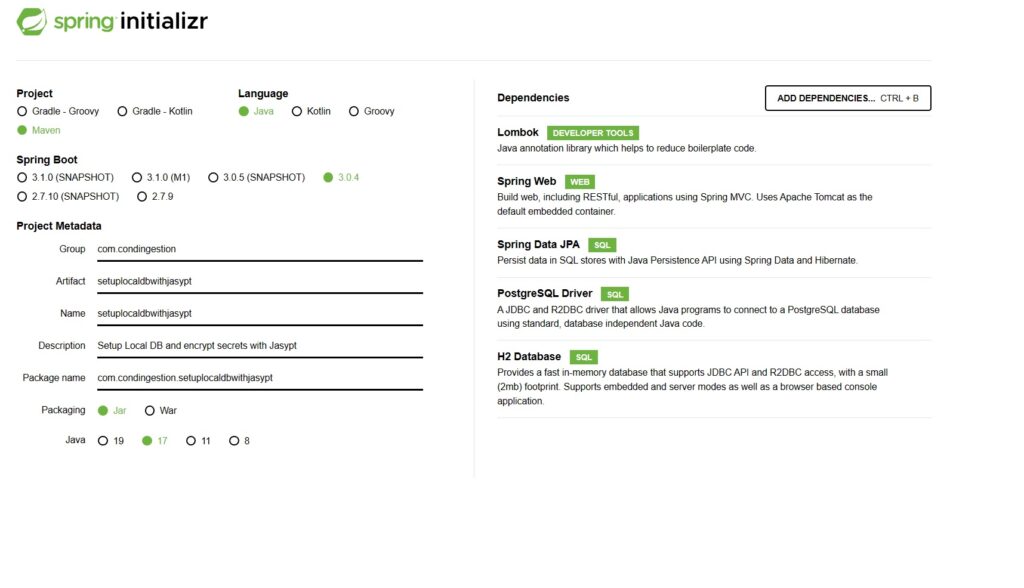
In order to setup the database profiles and encrypt properties with Jasypt using Maven, we need to access Spring Initializr and configure a few options like in the image below.
We will use Lombok for reducing the boilerplate code like getters and setters in our model classes. Spring Web is used for exposing some basic REST endpoints for validating operations against the database from Postman. Spring Data JPA will allow us to use Hibernate for performing reads and writes from the database without writing manual queries. I used two different databases, Postgre and H2 in order to show how to encrypt secrets like the username and password in two different ways: using enviromental variables and using Jasypt.
After filling the required fields and adding the dependencies, press Generate and an archive containing the application will be downloaded. After extracting it, you can just open it in your preferred IDE. For this tutorial I used IntelliJ. Before proceeding to writing code, we need to add two more dependencies for the Jasypt library in the pom.xml file (the jasypt-maven-plugin is required for running Maven commands with Jasypt):
<!-- under the <dependencies> section -->
<dependency>
    <groupId>com.github.ulisesbocchio</groupId>
    <artifactId>jasypt-spring-boot-starter</artifactId>
    <version>3.0.5</version>
</dependency>

<!-- under the <plugins> section -->
<plugin>
    <groupId>com.github.ulisesbocchio</groupId>
    <artifactId>jasypt-maven-plugin</artifactId>
    <version>3.0.5</version>
</plugin>
Step 2 – Add database related properties
Because we are using two different databases, I will create a separate profile for each of them, dev and prod. Spring will automatically create an application.properties file for you under the resources tab. We will create two additional files, application-dev.properties for H2 and application-prod.properties for Postgre. The idea behind the naming is that an in-memory database like H2 is very feasible for a local development environment, while PostgreSQL is more suitable for production environments.
Spring will run application.properties by default, so here we will specify the more generic properties that are available for both databases.
- application.properties
#specify which profile you want to use. If you select dev, then application.properties
#followed by application-dev.properties will be executed, if you select prod then
#application.properties followed by application-prod.properties will be run and if you
#specify default only application.properties will execute.
spring.profiles.active=dev

#the first 2 are for telling spring to print the SQL that is being executed in the
#console in readable format.
spring.jpa.show-sql=true
spring.jpa.properties.hibernate.format_sql=true
#these property will tell spring to create the database everytime you will start the
#application, and drop all the tables when it is stopped (this is also the default
#behaviour of H2). Not recommended for production.
spring.jpa.hibernate.ddl-auto=create-drop
- application-dev.properties
In order to use environmental variables, you need to access Edit configurations, select your applications and add the following in the VM options field: -Dh2.username=sa -Dh2.password=1234 . Afterwards, you can reference them by using ${variable_name}.
spring.datasource.driver-class-name=org.h2.Driver
spring.datasource.url=jdbc:h2:mem:setuplocaldb
spring.datasource.username=${h2.username}
spring.datasource.password=${h2.password}
#enabe the h2 console, available at /h2-console
spring.h2.console.enabled=true

#specify the dialect for suggestions when writing sql scripts
spring.jpa.database-platform=org.hibernate.dialect.H2Dialect
- application-prod.properties
In order to encrypt some property values using Jasypt, firstly you need to surround the actual value with DEC(any_value), like shown below. Then open a Command Terminal, navigate to the current directory and execute the following command (you need to have the jasypt-maven-plugin in pom.xml for the bellow command to work):
mvn jasypt:encrypt -Djasypt.plugin.path=file:src/main/resources/application-prod.properties -Djasypt.encryptor.password=codingestion
The first parameter is for specifying the properties file that contains the variables you want to encrypt. This needs to be specified because Maven will default to the application.properties file.
The second parameter is the secret key that is used for the encryption. For the application to be able to decrypt the values at runtime, we need to provide the key as a parameter. One way to do that is by adding it to the VM options fields as following: -Djasypt.encryptor.password=codingestion
spring.datasource.driver-class-name=org.postgresql.Driver
spring.datasource.url=jdbc:postgresql://localhost:5432/setuplocaldb
#decrypted values
#spring.datasource.username=DEC(postgres)
#spring.datasource.password=DEC(1234)
#encrypted values
spring.datasource.username=ENC(5sPPeprSO8ebkvJxnlzwPXrlxWnsS9hU/Dnuq1rzNwwwK38qc/AGJhNGSFC/4XLc)
spring.datasource.password=ENC(PrHcSo0foloMnMgBRzqCQfR6IfEJYWZkoUcKjWX820DsabElTJIjTui089lzWaWK)

spring.jpa.properties.hibernate.dialect=org.hibernate.dialect.PostgreSQLDialect
Step 3 – Add model, repository, service and controller layers
- Model Layer (create a package named model and create a class under it)
@AllArgsConstructor
@NoArgsConstructor
@Data
@Entity
@Table(name = "product")
public class Product {
    @Id
    @GeneratedValue(strategy = GenerationType.AUTO)
    private UUID id;
    @Column(length = 25)
    private String name;
    @Column(precision = 2)
    private BigDecimal price;
    private String description;
}
- Repository Layer (create a package named repository and create the interface under it)
public interface ProductRepository extends CrudRepository<Product, UUID> {
}
- Service Layer (create a package named service and create the class under it)
@Service
public class ProductService {
    private final ProductRepository productDAO;

    @Autowired
    public ProductService(ProductRepository productDAO) {
        this.productDAO = productDAO;
    }

    public List<Product> findAll(){
        return (List<Product>) productDAO.findAll();
    }

    public UUID save(Product product){
        return productDAO.save(product).getId();
    }
}
- Controller Layer (create a package named controller and create the class under it)
@RestController
@RequestMapping("/product")
public class ProductController {
    private final ProductService productService;

    @Autowired
    public ProductController(ProductService productService) {
        this.productService = productService;
    }

    @GetMapping(value = "/findAll")
    public ResponseEntity<List<Product>> findAll(){
        return new ResponseEntity<>(productService.findAll(), HttpStatus.OK);
    }

    @PostMapping(value = "/save")
    public ResponseEntity<UUID> save(@RequestBody Product product){
        return new ResponseEntity<>(productService.save(product), HttpStatus.CREATED);
    }
}
After adding all the required classes, you can just start the application.
Step 4 – Test the application
The application provides two operations, inserting a product and retrieving all products. We will test the Spring Boot database profiles setup and encrypt properties with Jasypt Maven by calling our controller endpoints from Postman.
- Test the H2 database by setting the spring.profiles.active settings from application.properties to dev.
- Test the PostgreSQL database by setting the spring.profiles.active settings from application.properties to prod.
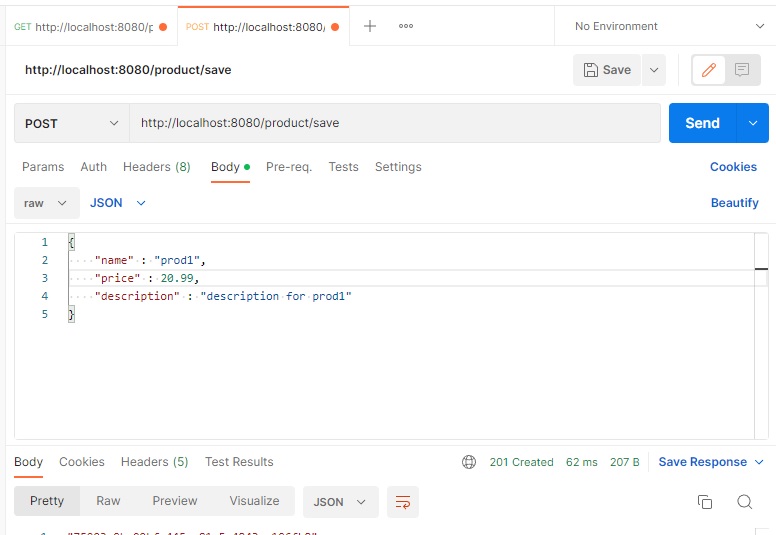
Create and execute the Save product request from Postman, as shown in the image below. You should get a 201 Created response.
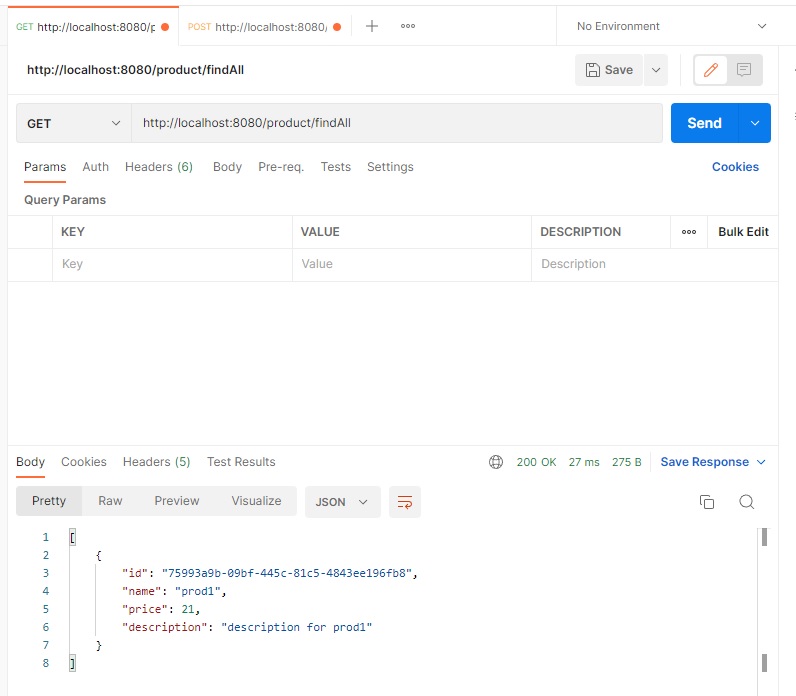
Create and execute the Get products request from Postman, as shown in the image below. You should get a 200 OK response.
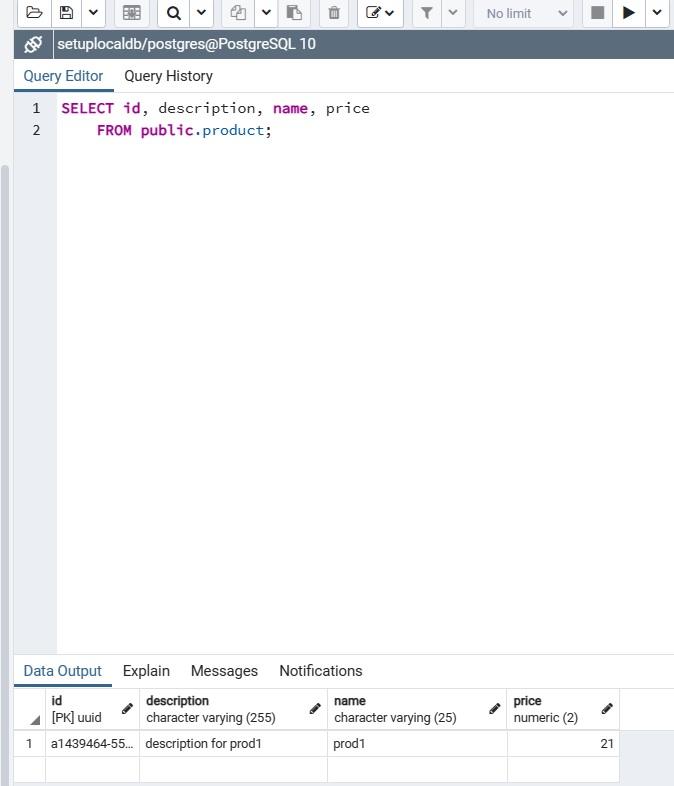
If you navigate to http://localhost:8080/h2-console, specify the database name, username and password that you used in application-dev.properties, you should see one entry in the table PRODUCTS. When you execute a select * from product query you should see the following entry:

For the PostgreSQL database, you need to create the database first in the pgAdmin tool. The tables will be created automatically by Hibernate when you run the application using the prod profile. If you redo the Save product request from Postman, you should see one entry in the PostgreSQL database as well.